
Store bought clothing is made for a specific height, and those of us who are shorter or taller than average know the problems of shirts that are too long, pants that are too short, etc.
Sewing patterns are also drafted for a specific height (often listed in the pattern itself for reference), and fortunately when we sew, we aren't stuck with clothing that is too short or too long - we can alter the pattern to fit us perfectly!
So how do we do this?
The actual step-by-step process of adjusting a pattern is pretty simple - it involves cutting the pattern pieces horizontally (sometimes in more than one place), and then adding more paper in between (to add length), or overlapping the pieces (to remove length).
What is more complex, is deciding HOW MUCH to adjust the pattern pieces. There are a lot of different factors that can affect this number (as well as methods to calculate it), and we're going to cover them in this post.
Before we calculate a number, there are some important things we need to know and/or consider.
Adult patterns are typically drafted for the same height across all sizes - unlike children's patterns, where the height is different in each size.
As such, the methods used to calculate and adjust adult and children's patterns are different. In this post, we will be focusing on adult patterns.
We won't be covering children's pattern adjustment methods in this post, but I recommend checking out this post by Goober Pea Designs on shortening/lengthening patterns for kids.
This is an important piece of information, that is often (but not always) included in the pattern instructions. For example, Buttons & Blueprints adult patterns (for curvy bodies) are drafted for a height of 5'5" - this information is found on their size chart page, and their height adjustment instructions. Not all patterns will include instructions for adjustments. Some will not even state the height they draft for, but you can ask the designer and they should have a specific answer.
There are two main methods to calculate the amount to shorten or lengthen your pattern pieces. The first is more of an estimation based on height and proportions, whereas the second involves detailed measurements of both the body and the pattern pieces to compare them.
If you have average body proportions, this method is fairly simple.
First, calculate the difference between your height and the pattern drafted height - eg. if your height is 5'1" and the pattern is drafted for 5'5", then the difference is 4".
Next, determine what percentage of your height the garment is intended to cover. For example:
Then multiply the difference by the garment coverage percentage. Eg. 4" height difference = 2" (50% of 4") removed from pants length, about 1.5" removed from a top, 3" removed from a maxi dress, etc.
If your torso/leg proportions differ from the average (as shown below - long waisted or short waisted), then you will need to adjust accordingly, making estimates based on your knowledge of your own body.
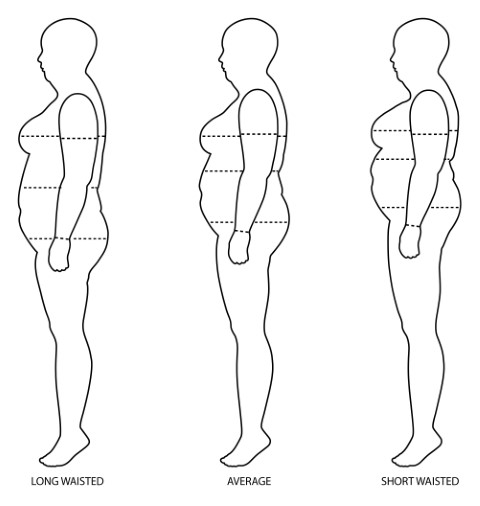
For example, I am 5'3", but I am short waisted with longer legs (proportionately). So I need to remove less length from pants, and more from tops, than someone with average proportions.
Note - arm length for long sleeves is harder to estimate. I generally recommend the method below (comparing my actual arm length to the pattern piece or finished measurements) for long sleeve length.
This method is more time consuming, but more accurate.
First you need to determine the length of the finished garment. Many patterns include a chart of finished measurements, which makes this step much easier - just look it up in the chart.
If the pattern does not include finished measurements, you can measure the length of the pattern pieces and deduct the seam/hem allowance
For example:
The finished sleeve length should be 22" (23" minus .25" seam allowance at the top, and .75" hem allowance at the bottom).
Next, measure your body in the same area - in this case, from the tip of the shoulder bone to the wrist, where the sleeve should end. Let's say your arm measures 24".
The difference between the two numbers is the amount you need to lengthen/shorten the pattern piece. So for our example, with a 22" finished sleeve, and a 24" arm length, we would need to add 2" in length to the sleeve pattern piece.
This gets more complex when there are multiple pattern pieces to measure for one body area. For example, if the sleeve has a cuff, then you would need to measure both the sleeve pattern piece and the cuff pattern piece, adding them together and deducting seam allowance. Since the cuff is folded in half, you would also have to divide the cuff length by 2 before adding it to the sleeve length.
If you need help figuring out how much to shorten or lengthen a Sew PDF pattern, feel free to reach out to us via social media or email! Please be sure to include your relevant measurements - height, arm length for sleeves, inseam for pants, etc.
For more info on how to actually add or remove the length from your pattern pieces, check out this blog post.
This is such a helpful guide! Figuring out exactly how much length to add or remove can be tricky. I sometimes use a Height Comparison tool to visually see the difference between my height and the standard pattern height. It really helps me plan my adjustments.